The JET Guide to Wobbly
Learn how to use Wobbly, the Vapoursynth manual IVTCing tool. This guide covers the basic use-cases, recommend settings, and how to use Wobbly so you can perform IVTC to your heart’s content.
To start reading, you can click on the arrow on the right or press your → key to go to the next page, or you can browse the page index on the left.
The project is hosted on Github.
Getting started
New to Wobbly or IVTC/Deinterlacing in general? Check out our quick primer to get a basic understanding of the relevant topic and theories.
Contributing
Spot a typo or problem with the guide? Want to contribute to Wobbly? Check the contribute section!
Disclaimers
This guide may not always be entirely up-to-date with what newer commits offer. Programs may be in constant development, so if something is outdated or you find any errors in this book, please contact us!
This is neither a Vapoursynth nor a filtering guide. This book explains how to use a Vapoursynth tool, but figuring out how to make use of the output is up to you.
A Primer on Telecining
When working on DVDs, you will no doubt come across a fairly annoying artifact: combing.

Virtually every DVD has these, and in some cases you may even find them on Blu-rays!
What you’re seeing here is called telecining. It’s very common for digital anime to be animated at a constant 23.976 frame/s However, old analog TVs would always broadcast video at 29.97 frame/s. This became a problem for anything that wasn’t that exact framerate, such as a lot of movies and TV series, and, indeed, most anime.
Telecining Patterns
In order to fit within that constraint, telecining patterns were conceived. For regular anime framerates, there are four frames of the original animation (also known as FILM) for every five frames of 29.97 frame/s video, as shown with the following simple equation:
$$ \frac{23.976}{29.97} = \frac{4}{5} $$
To deal with this, many studios have been exploiting the interlaced nature of 60Hz video. In interlaced video, every frame is split up into two incomplete images, also known as fields. Each field takes up either the even or odd rows of a frame. By abusing how this works, studios have been able to fit 23.976 video into 29.97 by splitting each frame up into fields and duplicating them as necessary.
To achieve a clean 23.976 → 29.97 frame/s conversion, 4 frames must be represented as 10 fields. This is done by duplicating fields following a set pattern. Assuming each frame in a cycle is labelled alphabetically, you get frames A, B, C, and D. When telecining, the fields of these frames will often alternate like so:
$$ \frac{A^1 - A^2 - B^1 - B^2 - B^1 - C^2 - C^1 - D^2 - D^1 - D^2}{2 - 3 - 2 -3} $$
This telecining operation is called 3:2 pulldown, and is the most common form of telecining there is for anime.
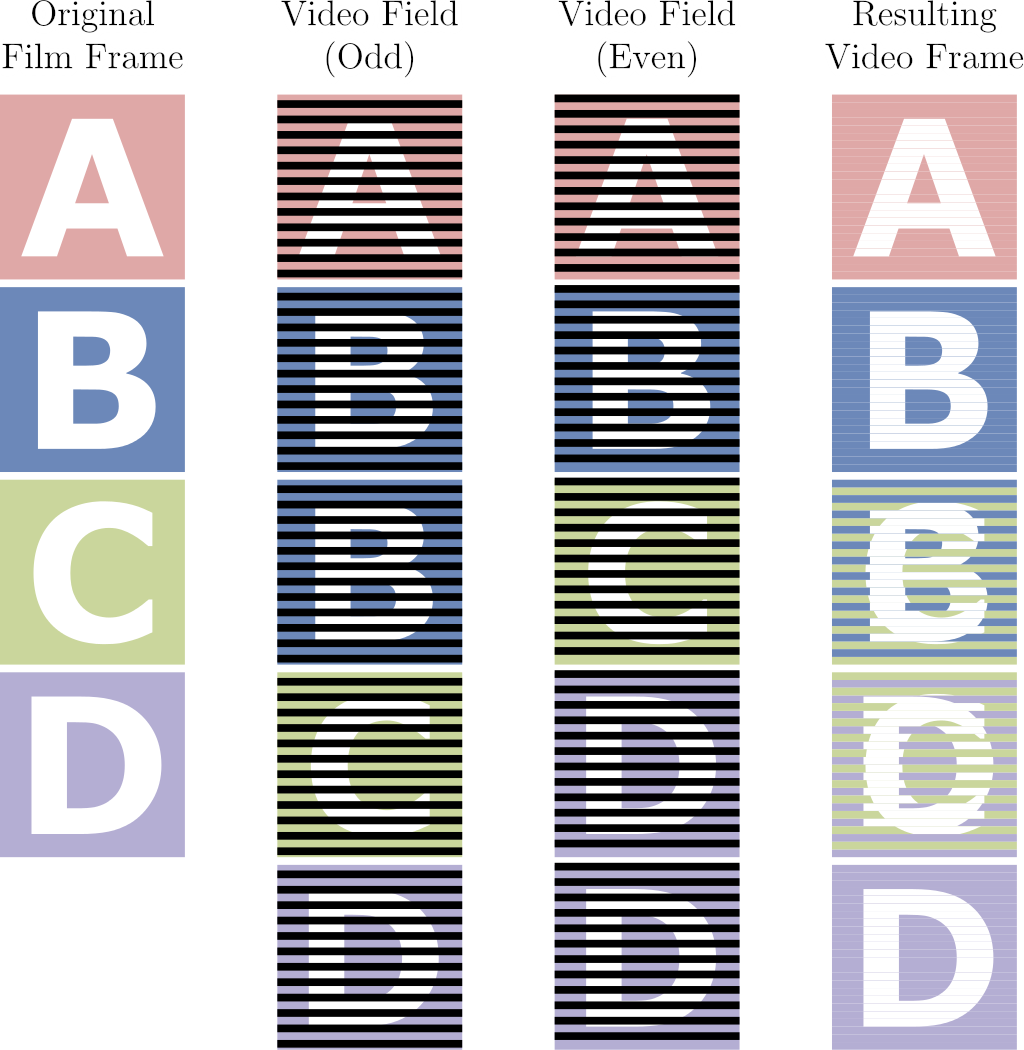
Other forms of pulldown exist as well, but 3:2 pulldown is the most well-known pattern for NTSC sources. For PAL video, different patterns will be required to fit 23.976 → 25 framerates (and crucially, Wobbly does not currently offer support for the kinds of patterns used for PAL video).
Telecining vs. Interlacing
Interlacing and telecining are often mixed up in common vernecular. However, it’s very important to understand the differences between the two prior to filtering, and to be able to diagnose which frames make use of which.
Interlacing is, in essence, the combing-like artifact you see, even with telecining. The difference is that with a fully interlaced video, there are no fields to match together. Every field is unique, so the proper way to handle these is to deinterlace them and double the temporal resolution.
Telecining follows a predictable pattern and is used to convert a lower framerate into a higher one (using for example the aforementioned 3:2 pulldown). Certain frames may be interlaced, but you are not required to deinterlace them. Because the video was originally of a lower framerate and a consistent pattern has been applied to increase it, the original frames can be nigh-losslessly restored.
When deinterlacing, what you’re doing is splitting up the video frames into fields and interpolating them up into full frames. Every field is half the vertical resolution of the video, so when deinterlacing a frame you’re effectively throwing out half the vertical resolution and trying to recreate what it may have looked like. With telecined content, this does more harm than trying to reconstruct the original frames by matching the fields and is thus not preferable unless you’re dealing with post-processing that broke the pattern.
Cycles and Pattern Breaking
When Inverse Telecining (also known as IVTC), it helps a lot to think of the video in terms of cycles. Within a telecined 29.97 frame/s video, assuming the source video is 23.976 frame/s, each cycle will be five frames long. Post-IVTC, that cycle must be reduced to four frames.
However, patterns will often break in anime, as it’s not uncommon for studios to be editing 60i footage directly. This means that any splices made during that process may result in the cycle being broken, and will result in orphan fields being created.
Orphan fields are fields with no pairing field available to reconstruct the original frame with. They’re an artifact leftover from improper splicing and trimming, and can by nature no longer be losslessly restored. The most common method to handle those is to drop the next or previous field depending on the type of orphan. This, however, has the drawback of creating a small “hiccup” during playback if the scene has a lot of motion prior to the scenechange.
60i and Variable Framerate Footage
In the early digital era, a lot of studios were still experimenting with digital tooling. This included working directly on 60i video, as well as mixing different framerates together.
A common example of editing done on 60i video is interlaced credits. When checking each individual field, sometimes you may notice that certain elements are unique in each field. These are interlaced, and must be deinterlaced. This may not always be straight-forward however, as with for example interlaced credits, the underlying video is still 23.976 frame/s content, and deinterlacing may cause a lot of damage to it. There’s various different ways to handle deinterlacing such content, and the most common cases will be handled on their own pages.
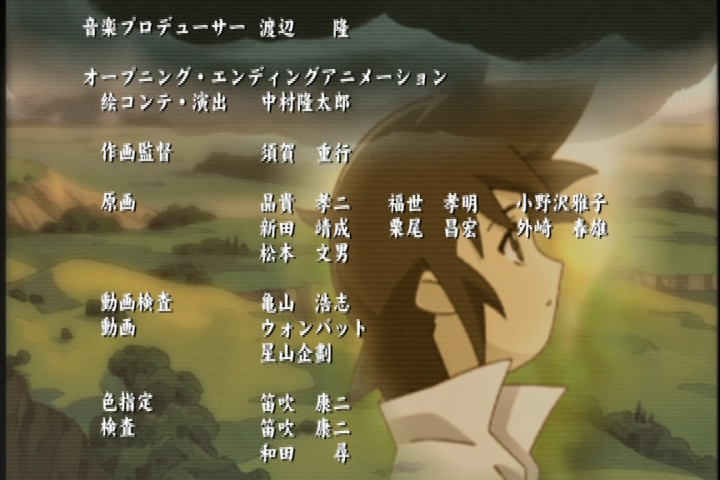
In some rarer instances, certain animations or effects may also be animated at 29.97 frame/s. These will often play back completely fine on 60i video, and appear progressive. This may also extend to certain effects such as panning shots, zooms, background animations, or even video effects or CGI elements. In order to properly preserve those, you must output a Variable Framerate (VFR) clip or store frame time information in an external file and mux those into the video container after encoding. This means the scenes that are telecined must be marked as 23.976 frame/s post-IVTC, and the scenes that are animated at 29.97 frame/s must be marked as 29.97 frame/s. Most deinterlaced scenes where the temporal resolution has been increased must be marked as 59.94 frame/s. Exceptions may include cross fades or 59.94 frame/s credits on top of 23.976 or 29.97 frame/s animation, which you still want to pull down to your target framerate.
Additional Learning Resources:
Limitations
Before you get started, it’s important to be aware of the limitations that come with Wobbly. No software is perfect, and this holds true for Wobbly as well.
5-Frame Cycles Only
Wobbly is limited to 5-frame cycles. This means it can only ever be used for NTSC content (such as Japanese or North-Americans DVDs, see this wikipedia page for more information), and will not work on PAL/SECAM video.
This also includes variable telecine cycles. Wobbly always assumes a clean 3:2 Pulldown algorithm was applied to the input clip, and no support is currently given for other patterns.
Deinterlaced Footage
Wobbly has no support for footage that was deinterlaced or pre-fieldmatched. Deinterlacing comes in many shapes and sizes, the most common of which is through filters such as YADIF (found in FFMpeg). These are destructive by nature and will not give Wobbly anything to work with. Another common example of deinterlaced footage is footage with blended fields (which often matches the original telecining pattern, such as AABBA).

Similarly, content that has its fields already matched and only requires decimation are not currently supported in Wobbly. It relies on knowing the fieldmatches to determine how a clip should be decimated. It simply does not know what to do with progressive content.
“True” VFR
Wobbly does not currently support true VFR. Decimation is strictly based on the telecine cycle, meaning that VFR ranges get rounded. This is a side-effect of Wobbly only supporting a very limited number of framerates (6, 12, 18, 24, 30).
Similarly, Wobbly does not currently allow you to easily output 59.94 frame/s video. This can become an issue when you must deinterlace a scene and want to make use of the timecodes provided by Wobbly.
Decimation Breaks
This is a regression from YATTA.
Due to the way footage was commonly edited during the early digital era, a lot of editing was done on telecined footage. This means you may get splices that results in extra frames being left in, ruining the decimation cycle. Wobbly will simply set it to a wrong framerate, whereas YATTA would automatically determine this was the case and add a decimation by itself. We cover how to do this manually in the Fixing the Framerate section, but it’s something that should honestly be done automatically.
Outputting 60p
Wobbly does not currently support 60p output. This means that if you have any scenes that feature 60p footage (commonly pans, text added in post, or other effects), you must handle that yourself in your Vapoursynth script. This also means you must generate your own timecodes file and can’t rely on the one Wobbly outputs.
Installation
We recommend downloading Wobbly from the JET fork.
To continue, you must unpack the zip file. Make sure you unpack it in a place where you’re sure it won’t be moved from in the future! An easy place to put it is in your Documents directory.
Downloading a pre-release version
If the most recent release is not up to date with the master branch, then you might want to consider downloading the latest master build. If the build has not expired yet, it will start downloading the latest snapshot.

Dependencies
Wobbly has the following dependencies:
- BestSource (optional, input dependent)
- d2vsource (optional, input dependent)
- DGDecNV (optional, input dependent)
- DMetrics
- FieldHint
- SCXVID
- TDeintMod
- vivtc
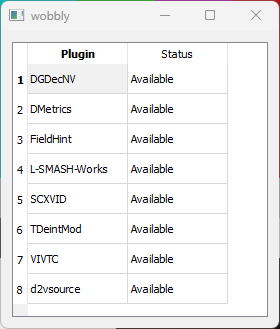
You can verify it can find the plugins by opening Wobbly, hovering over the “Tools” dropdown menu at the top of the window, and clicking on “Check plugins”.

This will open up a window displaying the plugins it was able to find.
Indexing with Wibbly
For Wobbly to do its job, you first need to create a JSON file for it to read and write to. This file should contain source information, trims, matches, and many other metrics. This is where Wibbly comes in. Wibbly will run over a given file and gather the necessary metrics for wobbly to work properly.
Loading Videos
Wibbly consists of two main windows:
- The jobs window
- The video output window
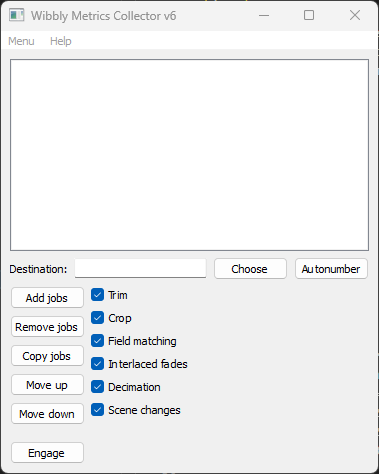
The main jobs window is where you create metric collecting “jobs”. You can drag video and specific indexing files into this window, and by clicking on them you can choose which metric gathering operations you’d like to perform.
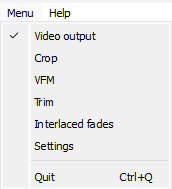
You also open up different windows from this main window. It’s recommended you select every window so you can easily adjust settings on the fly. The state and geometry get stored in an ini file and will persist when you open up wibbly again next time.
The video output shows a very simple output of the given video file. You can framestep or jump to a specific frame or time. When you first open up Wibbly, this window will be empty. To load a video, we first need to drag a video file into the jobs window.
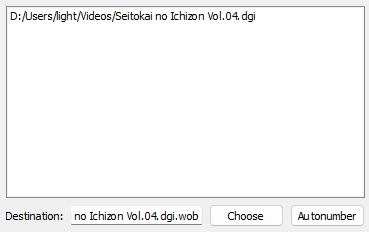
Wibbly accepts the following inputs:
- Common video formats BestSource can read (such as m2ts, mkv, etc.)
- dgi index files
- d2v index files
Note that, if you use BestSource, your source file must be remuxed to MKV format.
Take note! If DGIndex reports that your source is (almost) 100% FILM, you do not want to use Wobbly on it! FILM denotes how much of the indexed clip is soft-telecined. If the entire clip is FILM, there is no reason to perform any IVTC on it and instead you should simply ignore the flag.
Gathering Metrics
Once you’ve indexed a video file, the video will show in the Video Output window.
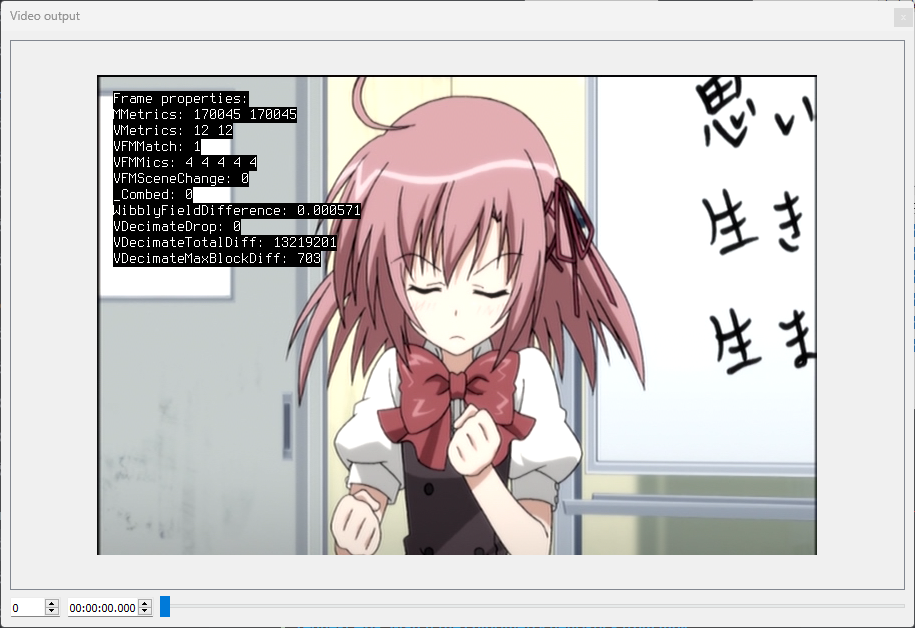
Before you begin, it’s a good idea to double-click on the current job inside the Jobs window to ensure it properly applies any settings you set to the Job. The first two things you want to do is trim and crop the video as necessary.
When trimming, be aware that the trims are inclusive. This means that if you trim frames 0–100, frame 100 will be included in the trimmed clip. If you’re working with TV caps, you’ll want to make sure you trim out only the actual episode and ignore all the sponsorcards and advertisements. With DVDs, you may have indexed multiple episodes at once. Trim out only the episode you want to work on, and ignore the others. If you want to work on the other episodes, make sure you give each output file a unique name so you don’t accidentally overwrite them with the next metrics gathering!
Cropping is done to get rid of the black bars on the sides of the video. Keeping those may mess with the metric gathering, so it’s safer to remove them. With YUV420 video, the final output image must be mod4 vertically and mod2 horizontally, so you may need to crop slightly more to get rid of all the black bars. The Video Output window will update as you select crops, so you can see whether a crop is being applied properly immediately.
Next, you select the threshold for interlaced fades detection. Interlaced fades are fading effects applied to a video that was telecined to 29.97 frame/s. These fades will be 29.97 or 59.94 frame/s, but the underlying animation will often be 23.976 frame/s, so we must pull them down. To determine a healthy threshold, locate an interlaced fade in your video and adjust the threshold until it catches the entire fade. Don’t make the threshold too low, or else it may catch non-fades by accident!
Finally, you want to select the metrics to gather. These can be selected in the VFM window. You can leave most of these settings alone, but make sure you always tick “Enable DMetrics”. If your video is Bottom-Field-First, set “order” to “0”. Furthermore, if your source has chroma with a different telecining pattern, ghosting, blending, etc., untick “Chroma” in this menu as well.
Running Your Jobs
Once you’ve set all the settings and prepared your jobs as best you can, it’s time to execute them. In the Jobs window, you can select which operations to perform per job. To switch jobs, simply click on the job you want to change settings for inside the Jobs window.
It’s recommended you gather metrics for every single option available. Exceptions may be trimming or cropping if they’re not performed, or interlaced fades if you are absolutely certain there are none. If you have a source that is almost certainly a constant pattern as well (such as TV caps for example), you may also skip metrics such as scene detection, decimation, and interlaced fades. This may speed up the metric gathering a bit, but it’s still safer to check for everything.
Once you’ve made your choices and made sure everything is correct, click on the “Engage” button. A new window will pop up and show the estimated time until each job is done.
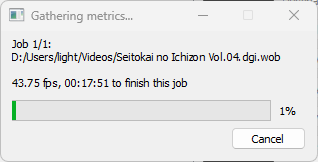
Once this is done, you will have a “wob” file in the location you’ve told it to save it (by default next to the source file). This file is simply a JSON file and contains all the metrics Wibbly has gathered for you. These will be read and modified by Wobbly.
Using Wobbly
Wobbly’s job is to act as a GUI to easily adjust fieldmatches. It makes use of the metrics collected by Wibbly to prepare a clip, and can process those to IVTC a clip.
To get started, grab the “wob” JSON file you generated using Wibbly (or any other metrics gathering tool designed for wobbly) and drag it into the Wobbly window.
Familiarizing Yourself with the UI
The main window of Wobbly consists of two tabs called “Source” and “Preview” which provide different video views. The “Source” tab shows the loaded video with only fieldmatching applied. The “Preview” tab shows the video with both fieldmatching and decimation, as well as any filters from custom lists and the like. When working with the video you’ll usually want to use the “Source” tab so you’re able to see all frames. When manually fixing up decimation it can be helpful to check the “Preview” tab.
Below the main preview you’ll see a row of smaller pictures showing the previous and next frames. These are especially helpful when editing sections (i.e. scene changes). You can configure wobbly to show more preceding and following frames in the settings.
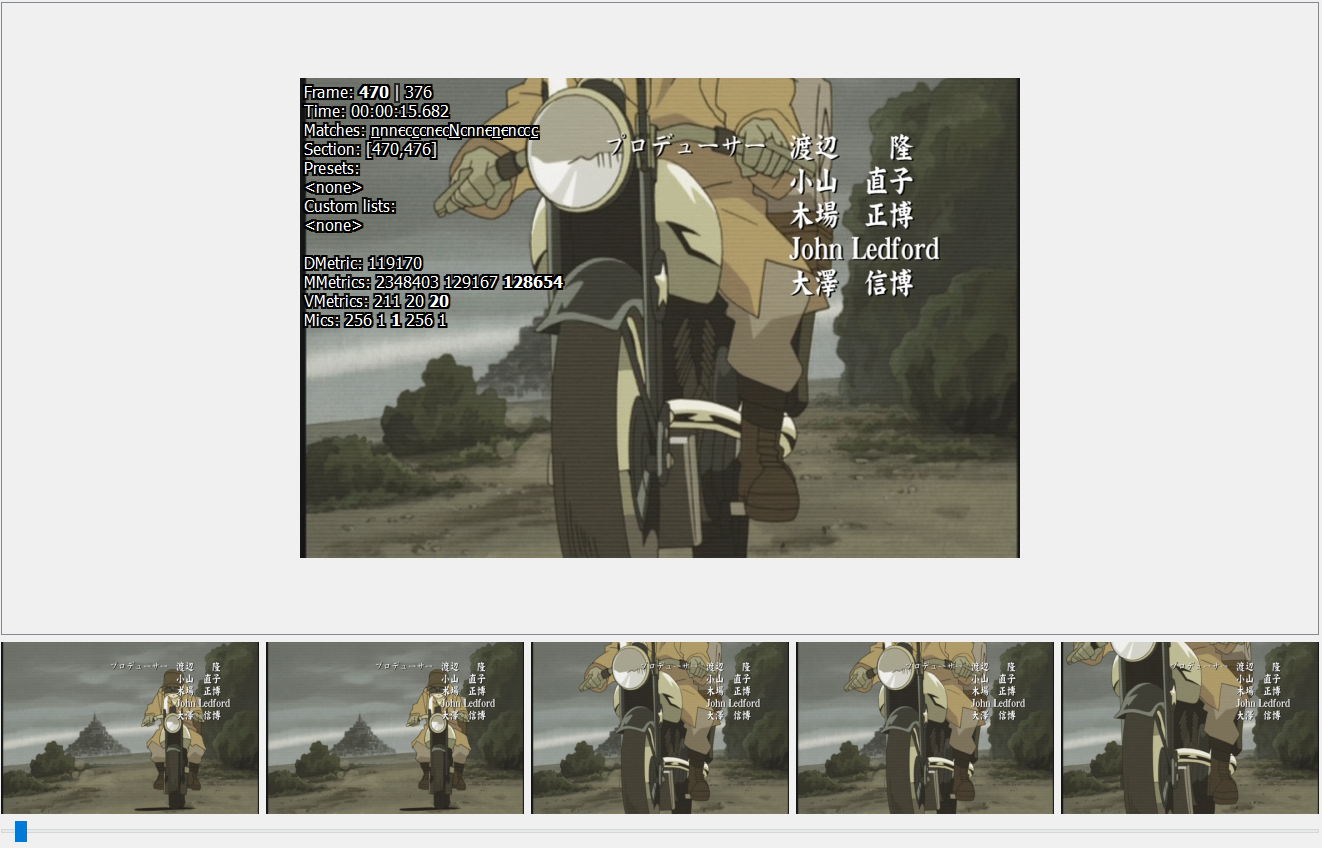
Wobbly shows a lot of text on the main video display. The most important of the values shown is the list of matches, but let’s go through all of them in order:
- Frame: Shows the current frame number before decimation and after decimation.
- Time: Take a guess.
- Matches: This shows how the frames around the current frame are fieldmatched. The capital letter corresponds to the current frame. The underlined letters are the ones at the start of a five-frame cycle, i.e. the ones whose frame number (before decimation) is divisible by 5. The crossed out letters are the ones corresponding to decimated frames.
- Section: Shows the section the current frame belongs to.
- Presets and Custom Lists: Shows the presets and custom lists assigned to these frames.
- DMetric: Shows the frame’s duplication metric. This is one of the metrics that was computed when running Wibbly. The lower the number, the more likely the frame is to be a duplicate of the previous frame, which means that this or the previous frame can be decimated.
- MMetrics, VMetrics, and Mics: Shows various fieldmatching metrics for the current frame.
MMetrics and VMetrics are computed by the
dmetricsplugin and show metrics for the three matches b, c, n. Mics are computed by VIVTC and shows metrics for all possible metrics (c, n, p, u, b), though u and b are equivalent to p and n of the next/previous frame. The metric/mic for the frame’s currently active match is shown in bold. The higher a metric/mic for a given match is, the more combing the frame resulting from that match has, so the lower the metric/mic the more likely that match is likely to be correct.
See also the Wobbly docs.
Key Bindings
Wobbly can be a bit difficult to work around for beginners. This is because it’s primarily built to work with keybinds. This is a lot faster than pressing a button on-screen for every single operation, and considering how many actions you must perform, this will save you a lot of time and effort.
A list of keybinds can be found under the Settings tab.
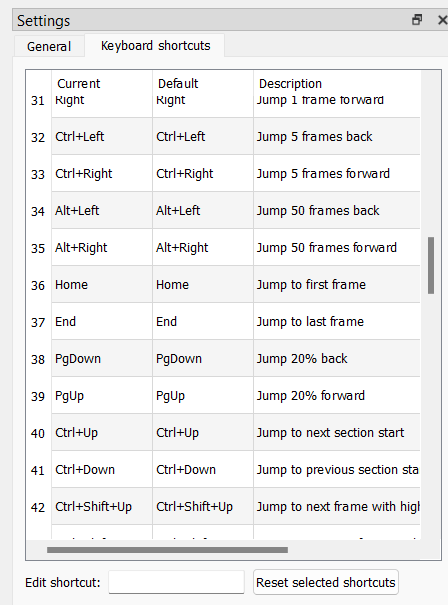
Here is a quick table containing the relevant keybinds:
| Key | Action |
|---|---|
| Left Arrow | Jump 1 frame back |
| Right Arrow | Jump 1 frame forward |
| Ctrl + Up Arrow | Jump to next section |
| Ctrl + Down Arrow | Jump to previous section |
| Ctrl + Shift + Up Arrow | Jump to next frame with high mic |
| Ctrl + Shift + Down Arrow | Jump to previous frame with high mic |
| Up Arrow | Jump to next frame with high dmetrics |
| Down Arrow | Jump to previous frame with high dmetrics |
| Shift + Up Arrow | Jump to the next combed frame |
| Shift + Down Arrow | Jump to the previous combed frame |
| I | Start new section at current frame |
| Ctrl + Q | Delete current section |
| S | Cycle the current frame’s match |
| Ctrl + S | Cycle through different patterns for the current section |
| D | Toggle decimation for the current frame |
| G | Jump to a specific frame (opens submenu) |
| Ctrl + F | Replace current frame with previous frame (freezeframe) |
| Shift + F | Replace current frame with next frame (freezeframe) |
| Ctrl + Z | Undo |
| Ctrl + Y | Redo |
| F5 | Toggle preview mode (Source ↔ Preview) |
| Ctrl + Num + + | Zoom in |
| Ctrl + Num + - | Zoom out |
| (Not bound by default) | Save Project |
These will be the shortcuts you’ll use most, so the sooner you can familiarize yourself with them, the better. You can always adjust them in this menu to your liking.
Make sure you don’t accidentally spam Ctrl + S to save the project! This is by default bound to “Cycle through different patterns for the current section”. It may be worthwhile to replace this keybind if you’re scared you’ll accidentally cycle through sections instead of saving.
Processing the Clip
The first order of business is to make sure you process the project. Wobbly makes use of Wibbly’s metrics to make its decisions, but it depends on the scenechanges being correct. Before you do anything else, you’ll want to jump from section to section and make sure every section starts and ends on an actual scenechange.
The following keybinds will be your new best friends while correcting scenechanges:
| Key | Action |
|---|---|
| Left Arrow | Jump 1 frame back |
| Right Arrow | Jump 1 frame forward |
| Ctrl + Up Arrow | Jump to next section |
| Ctrl + Down Arrow | Jump to previous section |
| I | Start new section at current frame |
| Ctrl + Q | Delete current section |
| Ctrl + Z | Undo |
The most straight-forward way to do this
is to simply press Ctrl + Up Arrow
and jump forwards until you find the start of a new section
that is clearly not on a scenechange.

You then delete this section by pressing Ctrl + Q,
and rinse and repeat.
You may sometimes find scenechanges being skipped.
To fix those,
you use the Left Arrow and Right Arrow to framestep,
locate the first frame of the scene change,
and press I on your keyboard.
It’s important for the processing to occur on sections that are larger than 10 frames. If you have for example a lot of flickers, it’s probably worthwhile to just create one larger section containing all of them, rather than a lot of smaller sections, as that may introduce issues during the processing. A simple way to look at it is that every section equates a scene, with a cut made on the start and end of it.
You follow these procedures throughout the entire clip, creating and deleting sections as necessary. Once you’re done, you can finally process the clip. Navigate to the Pattern Guessing window.
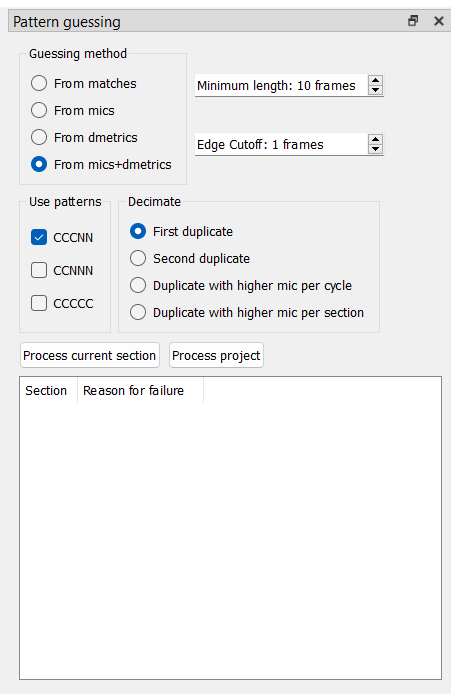
There are a lot of options here, so we will go over each of them separately.
Guessing method
- From matches
Try to guess the patterns using matches. This is unreliable and it will often result in a lot of errors where other guessing methods guess correctly. This is never recommended.
- From mics
Try to guess the patterns using mics. This option is the most reliable, but will also tend to result in the most errors.
- From dmetrics
Try to guess the pattern using dmetrics. This is in the middle in terms of errors returned, but the reliability of guessing is the worst of the 3 main modes.
- From mics+dmetrics
Try to guess the pattern using mics wherever possible to have the highest likelihood of the guessed scenes being correct. If dmetrics matches a scene mics didn’t, it will fall back on dmetrics. This is the in the middle in terms of reliability, with the least amount of errors.
Edge cutoff
Edge cutoff determines how many frames from the start and end of the scene get ignored. This is useful for video where the pattern changes constantly due to editing being done on 60i footage (and if you’re using Wobbly, chances are that’s exactly what you’re dealing with here). This will prevent pattern guessing from failing on scenes with an otherwise clear pattern because of orphan fields at the start or end of the section messing up pattern guessing.
There’s never really a reason to change this from “1 frame”.
Use patterns
These are preset patterns the pattern guessing tries to look for. This should always be set to CCCNN, as wobbly is built around automatically dealing with 3:2 pulldown. If you have a video with different patterns, you should instead be handling those manually in the Pattern editor tab.
Decimate
- First Duplicate
Drop the first N in a CCCNN pattern. This is usually the best option.
- Second Duplicate
Drop the second N in a CCCNN pattern. This may be more useful than First Duplicate if every second duplicate is consistently of lower quality due to compression.
- Duplicate with higher mic per cycle
Drop the duplicate that has the highest mic within the current cycle. This option is useful if you have a very starved source where the lower-quality duplicate isn’t very consistent, as those usually have higher mics. Note that this will likely return more framerate errors!
- Duplicate with higher mic per section
Drop the duplicate that has the highest mic within the current section. This means that if the first duplicate in every cycle within the current section has a higher mic on average, it will always drop the first duplicate. Else, it will always drop the second.
Process project
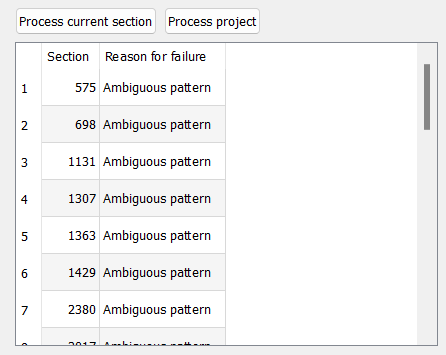
Once you have finished setting the aforementioned settings, click “Process project”. It will return a list of problem sections like this:
Handling Pattern Guessing Failures
After pattern guessing, there may still be pattern guessing failures.
Useful keybinds for this section:
| Key | Action |
|---|---|
| Left Arrow | Jump 1 frame back |
| Right Arrow | Jump 1 frame forward |
| S | Cycle the current frame’s match |
| D | Toggle decimation for the current frame |
| Ctrl + F | Replace current frame with previous frame (freezeframe) |
| Shift + F | Replace current frame with next frame (freezeframe) |
Fixing the Failures
There are two kinds of pattern guessing failures:
- Section too short
The section is too short for the guessing method. This is defined by the “Minimum length” setting. To fix this, double-click on the failed pattern guess in the list, adjust the section so it’s larger than or equal to the minimum length, and then click “Process current section”. If you did this properly, it should remve the section from the list.
- Ambiguous pattern
Indicates that Wobbly was unable to find the correct pattern. There can be multiple reasons behind this, but it most often means that you either did not set your section correctly, or that section can not be IVTC’d properly.
For every ambiguous pattern,
you’ll want to manually fix the pattern.
You can do this by double-clicking the failed guess in the list,
and then cycle through the pattern using Ctrl + S by default.
Note that this won’t remove the section from the list.
If you have a section that you are sure is 29.97 frame/s,
you can adjust the pattern in the “Pattern editor” window.
Set it to 30 fps and press Ctrl + S.
You’ll also want to apply this to any scene that requires specific post-filtering in your script.
This can be for example 59.94 frame/s credits on top of 23.976 frame/s video
(which is very common for Opening and Ending themes),
or scenes you can’t match properly
and must be pulled down to 23.976 frame/s.
Make sure you set it back to 24 fps
after you’ve dealt with every known 29.97 frame/s scene!
Leftover Combing
Pattern guessing may sometimes leave you with random combed frames that could not be matched automatically. Open the “Combed frames” menu.
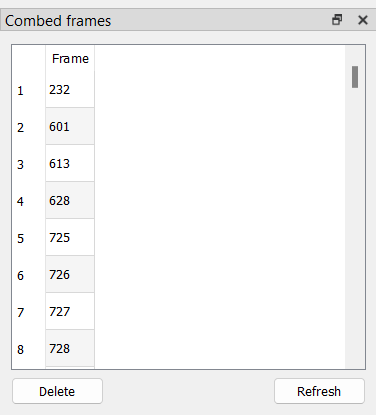
Before you do anything, click “Refresh”. This will perform another search through the clip to find any remaining combed frames. This may take a couple of minutes to finish.
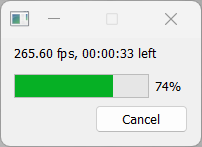
You can now double-click on all the found combed frames,
or jump to the next combed frame using .
For any combed frame,
you can press S to cycle through fieldhints.
If every cycle returns a combed frames,
consider adjusting the decimated frame
(using D to swap between decimated and not,
making sure you don’t ruin the framerates you just fixed),
or pulling it down in your filterchain later.
Another thing to take into account is that this will also find telecined fades. You typically do not want to perform fieldmatching on the fade itself, but just the underlying animation. If the caught combed frame is caused by the fade, ignore it and process it with a filter meant to deal with those in your filterchain later.
Freezeframing
If you find scenes of a duplicated clip
(that was not decimated due to being animated on twos/threes/fours)
that has very heavy compression artifacting,
it might be worth it to freezeframe it with either the next frame
(Shift + F)
or the previous frame
(Ctrl + F).
You can adjust these later in the “Frozen frames” window.
This usually won’t be applicable or worth it
unless you’re dealing with very starved video
and heavy MPEG2 blocking.
Crossfades
When dealing with fades to and from scenes, you’ll want to put the scene change somewhere in the middle. The first frame before a fade in is usually the best, unless it fades in from a solid colour with a clear scenechange. To deal with crossfades (that is, two scenes that fade into each other without a solid color inbetween) where the pattern differs between scenes, you can try creating a new section that captures just the fade. Wobbly may be able to accurately decimate that for you. If the pattern remains the same, there is no reason to do this.
Scenes that are likely to silently fail
Wobbly is reliant on the metrics it is fed, and those metrics do not always perform well in scenes with low-contrast combing or with a very slow pan/zoom. An example of the former scene is a scene with rain and no other animation. Depending on what pattern guessing method you used, Wobbly may not mark these types of scenes as having an ambiguous pattern, meaning that they will fail silently and you will not know that there is a problem that you need to fix. These scenes also usually cannot be caught by looking at combed frames, high-mic frames, or frames with high dmetrics. There is no solution to this other than to pay close attention to those types of scenes when you are QCing your encode. You need to understand the metrics being used and use that knowledge to predict failure. Looking at the metrics in the overlay can assist your understanding.
Fixing Framerate Failures
A list of useful keybinds for this section:
| Key | Action |
|---|---|
| Left Arrow | Jump 1 frame back |
| Right Arrow | Jump 1 frame forward |
| D | Toggle decimation for the current frame |
Now that you’ve made most of your matches, navigate to the “Frame rates” window. It’s easiest to go one frame rate at a time. First, select the “30p” checkbox.
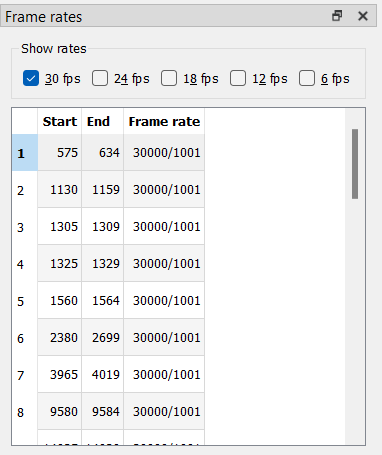
Handling 30p Scenes
29.97 frame/s framerates can show up for a couple reasons:
- You set a section to 29.97 frame/s yourself
This should be done on any scenes that are native 29.97 frame/s or 59.94 frame/s, or requires pulldown of some kind (overlaid 29.97 frame/s credits on 23.976 frame/s content, for example).
- Pattern changes on scenechanges leave you with an extra frame

This is not an uncommon occurrence, as with anime the editing is often done on the telecined video. The easiest fix for this is to simply decimate one of the extra frames. This ensures you keep a constant frame rate. This option is especially easy to take if the final frame in a section has an orphan field, as the easiest way to fix those is to drop it anyway. Another option is to keep that section 29.97 frame/s, though you may cause desyncs during timing/subtitle syncing with other subtitles this way.
Whichever option you choose, it pays dividends to be consistent. One such consistency you can take is to always drop the frame with an orphan field if possible (these will almost always be marked as B matches, so they’re easy to spot), and otherwise, drop the frame before a scene change if there is one. This is especially useful when IVTCing recurring clips, such as Opening or Ending themes, midcards, etc.
Handling 18p Scenes
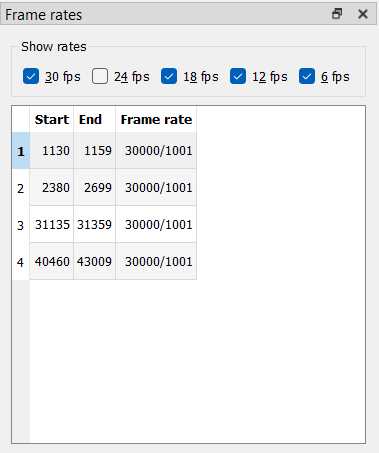
Once you have fixed all the wrong 30p sections, we move on to 18p. 18p is basically always going to be incorrect. As such, there should be 0 instances of 18p cycles left once you’re done with IVTCing.
Usually 18p scenes happen because of awkward pattern changes across scenes (or if you’re unlucky, within the same scene), or because an orphan field gets dropped which breaks the framerate. This means that in certain situations, you may be forced to restore a duplicated frame to ensure you still have a consistent framerate. This is why it’s recommended you apply the same consistency rule as with 30p scenes, but some of it in reverse. You restore orphan fields if possible, but at scenechanges, you restore the first frame of a scene if necessary (unless one scene has a pan and the other does not). This is because a “stutter” at the end of a scene is easier to spot than a stutter at the very start of a scene. If the 18p cycle occurs elsewhere, use your best judgment. Generally speaking, you can’t really go wrong if it’s for example in the middle of a scene.
Handling 12p and 6p Scenes
12p and 6p, simply put, only occur when you’ve made a mistake with manual decimations. You can simply fix them and then handle them as you would 18p framerates once you restore enough frames.
By the end of this, you should have a list of 29.97 frame/s scenes you manually and knowingly set this way.
Post-processing fieldmatched frames
Fundamentally, the point of IVTC is to paste two fields together and get a full frame out of them. However, even if you do the pasting correctly, the output frame might still have combing artifacts. This can happen if one field is brighter than another due to a fade to/from white applied to the telecined footage. It can also happen during a crossfade where one field is further progressed in the fade than the other.

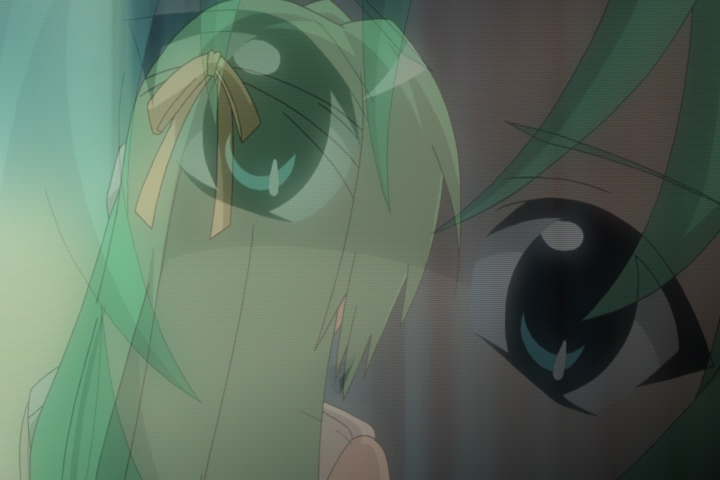
We can use vs-deinterlace’s fix_interlaced_fades and vinverse,
respectively,
to solve these two common problems.¹
Here are two image comparisons which show the respective fixes:
one,
two.
You can see that the vinverse fix is imperfect (there is ringing and other gunk on the eyebrow).
This guide will explain how to tell wobbly to apply these fixes to specific ranges of frames.
Setting up and using custom lists in wobbly
We can use the custom lists feature in wobbly to mark ranges that should be handled with vinverse or fix_interlaced_fades. Setting up custom lists is complicated, but you only have to go through the process once.
-
Set up presets
We need to set up “presets” in wobbly, which are basically vapoursynth functions that we want wobbly to apply to certain ranges.
For example, I can open the preset window, click new, name the preset “vinverse,” and put
clip = vinverse(clip)in the body. Or I can name the preset “black” and putclip = fix_interlaced_fades.Darken(clip, colors=[0, 0, 0], planes=[0, 1, 2])in the body—this would be for fades to/from black. Note that the usage ofclipis important; you cannot use another variable name. Every project probably needs a preset for white fades, for black fades, and for vinverse (for completion’s sake, the preset for fades to/from white could beclip = fix_interlaced_fades.Brighten(clip, colors=[1, 0, 0], planes=[0, 1, 2])).Obviously, something like
vinverse(clip)will error out if you do not import the vinverse function. You can do this in the same window you write the script. If you prefer to reduce the amount of imports in your script, you can also import the function in your own script instead.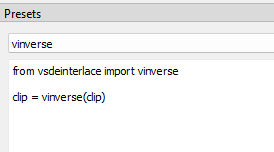
-
Create custom lists
We need to create custom lists that correspond to each preset. You can do this by opening the custom lists window and clicking “new.” Each custom list needs to be set as “Post field match” or “Post decimate.”
-
Match each preset to its corresponding custom list
In the custom lists window, there is a dropdown on the left that will contain all your presets. Highlight each custom list and use the dropdown to assign the relevant preset to each list.
-
Select the appropriate custom list
There is a hotkey to cycle through the custom lists. It is
xby default. You can see the currently selected custom list in the bottom right. -
Set the range and save it to the custom list
The hotkey to start a custom list is
eby default, and the hotkey to end the range and save it to the list isc. You can set a range “backwards” (presseon the last frame and then presscon the first frame).
Steps 1-3 take a fair amount of time,
but we can skip them.
When you’ve used wibbly to make a list of wobbly projects,
you can do steps 1-3 on the first one
and then immediately navigate to the rest of the projects
and use Project > Import from project to copy the information over
(but make sure you remove any frame ranges you have set first,
as it copies those over too).
Or,
since the project files are in plaintext,
you can use a text editor to copy the relevant information
and transfer it to new project files.
Do this at your own risk,
since a mispaste will corrupt the project file.
¹Note: Vinverse is not an adequate solution for crossfades where the fields in one part of the fade are not properly matched, like so:

Using vinverse is dangerous in general. It can be destructive, and so turning it on in the middle of a scene can create a jarring change from one frame to the next.
Making Use of the Wobbly Output
There are two straightforward ways to make use of the clip you’ve just fixed up in Wobbly.
From Wobbly Itself
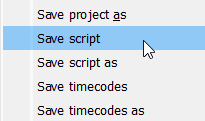
Within Wobbly’s “Project” dropdown menu, you can save a script. This will output a “vpy” file next to the Wobbly JSON file.
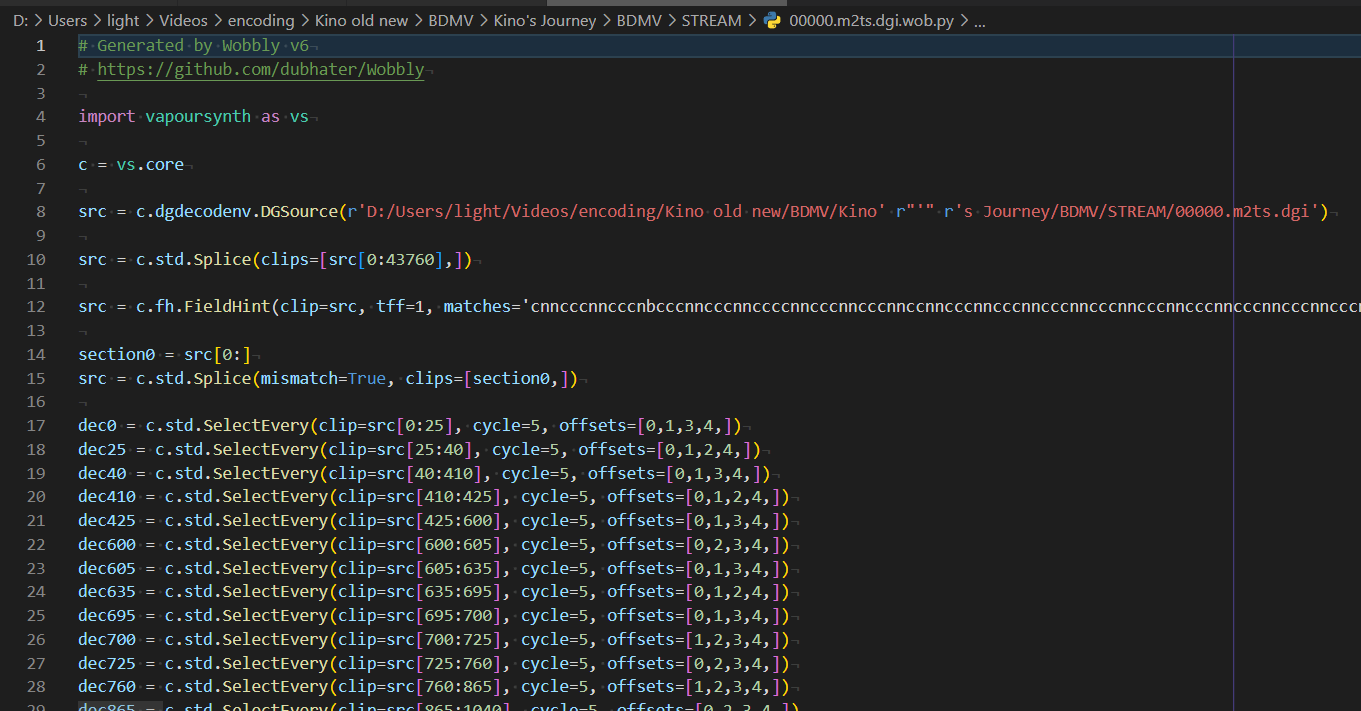
You can simply stick the contents of this script into your own script and work from there.
Make sure you set the Field Based property to “Progressive” after you’ve imported the script! This can be done using either of these functions:
Using stdlib
src = src.std.SetFieldBased(0)
Using vstools
from vstools import FieldBased

src = FieldBased.PROGRESSIVE.apply(src)
Using vs-wobbly
TODO
Timecodes
Wobbly can also output a timecode file. This should be muxed into the final container alongside your video to make sure it properly displays VFR content. If the end result is a Constant Framerate, you can skip that so long as you mark the framerate correctly during encoding.
Want to contribute? Caught a topic we should’ve reaaaalllyyyy caught ourselves but didn’t? Leave an Issue (or heck, even a PR!) on the GitHub repo and we’ll check it out!
Please make sure you use Semantic Line breaks in your PRs.
If you get rid of them in your PR,
I will rid you of your spine.
The only currently accepted English dialect is American English.
We currently do not accept PRs for very minute changes. Please write an Issue instead.
Notable Contributors
Guide:
- LightArrowsEXE (Primary author)
- Zewia (Proofreader, knows the ins and outs better than I do)
Development:
- Myrsloik (YATTA and Vapoursynth developer and creator)
- dubhater (Wobbly developer and creator)
- Setsugennoao (Current Wobbly maintainer)
- arch1t3cht (Added the undo keybind, the best update Wobbly has ever received (real and factual))
Disclaimer
Accountability for content
The contents of our pages have been created with the utmost care. However, we cannot guarantee the contents’ accuracy, completeness or topicality. According to statutory provisions, we are furthermore responsible for our own content on these web pages. In this matter, please note that we are not obliged to monitor the transmitted or saved information of third parties, or investigate circumstances pointing to illegal activity. Our obligations to remove or block the use of information under generally applicable laws remain unaffected by this as per §§ 8 to 10 of the Telemedia Act (TMG).
Accountability for links
Responsibility for the content of external links (to web pages of third parties) lies solely with the operators of the linked pages. No violations were evident to us at the time of linking. Should any legal infringement become known to us, we will remove the respective link immediately.
Privacy Policy
-
This page does not store any of your data by itself.
-
This project is hosted on GitHub.
GitHub may store information about your visit in the form of log files. Read the privacy policy of GitHub for further information.